Saturday, November 24, 2012

Straddling the Ephemeral

There are certain sights that pull my feet off the ground and leave me feeling like a specter in the world of the living. Most of they include things that I know I would have trouble representing visually. Like if I had my sketchbook, I could only draw the image by blowing sand across the pages.


In Canada, those sights include the first time you can see your breath, or when hoarfrost turns a skeletal tree into an icy feather duster. In Afrika it was the glowing embers shining like gems after a field fire, or just smoke. There is always a lot of thick, black smoke in Afrika.

St. Lawrence Ice Floe by Deline Lottering

While in Quebec City last winter, I remember seeing ice floes on the St. Lawrence Seaway. I remember staring at them because it was neither liquid nor solid. Standing there, the river seemed to me like a road built out of clouds. Like an earthly version of the Milky Way, snaking around the isle of Stadacona.


Light House by Julienne Lottering


In a family of visual artists, one thing we all have in common is the desperation of trying to capture those ephemeral images that somehow seem to straddle different worlds. I can already see the next series of paintings I will make. Here's a sample pic:


Tuesday, October 23, 2012

Gold Leaf

So, after a hiatus, during which I’ve been crazy busy with author events and workshops, I’m back for the last lap on the painting. In fact, I ran our of resin and had to wait until the hardware store could order the industrial quantity that I needed.

In that time I worked on the lungs and heart, adding gold leaf and bits of detail here and there.


The lungs needed a more organic feel, and I also added some golden veins to the heart.


With all the glare it’s hard to really get the gist of it, but there are several layers going on, and some pretty wild reflections. As my good friend Benjamin once said: “Some things are just better in person. Like side-boob.” And yeah, just like side-boob, for this painting you definitely need a good vantage point. The effect does change depending how close you get and from which angle you view it from.


Friday, October 05, 2012

CuO3

The Copper Patina Experiment


It's been about 24 hours since I sprayed the disgusting and incredibly noxious vinegar-ammonia solution onto the copper to test. And It looks like the medieval formula beats out modern chemistry. The Muriatic Acid, a pool cleaning chemical you can buy at any hardware store, has actually dissolved the top layer of copper before it started oxidizing, leaving it much cleaner looking at first, then kind of discoloured and blackish. That black patina is actually a different kind of rust happening on the copper—one that I want to avoid. The black oxide is what happens on pennies when you touch one with your grubby ball-scratching fingers.


What I want is the verdigris, the green tint. Although I now know it is possible, I have decided to avoid using a weathered copper for this painting in particular. I want the heart as shiny as possible. Next time I will try a nail polish resist with the patina I made. You could do some interesting stuff!

I poured the 2nd layer and now I'm waiting for it to cure.

Thursday, October 04, 2012

The Circulatory System

So the image I want to work with is the circulatory system. I love the idea of the heart as a pump. Haloed around the pump are the lungs.


Here you can see the connections from the veins and arteries to capillaries. In my mind I see a wing. I'm really not sure why, but I'm a sucker for bending metals. These are mostly copper plate and guitar strings.

Detail of capillaries

I get a feeling this is going to be a heavy painting. with a bit more relief than any of the other resin cast paintings I've done in the past.


Here it is, sitting on the table waiting for its next coating. I always want to do it so soon, but this time I have to wait until my copper patina experiment has worked out.


The Patina

I am experimenting with different acids and oxidizing agents to see if I can give this copper plate a greenish-blue patina. Basically I'm trying to force the process of weathering which turns copper that nice Statue-of-Liberty colour into an overnight event. The right side is muriatic acid, into which the piece was dipped. It looks cleaner than the original, but maybe it takes some time.

The rest of the plate is a sprayed on agent I made from vinegar, salt and ammonia. (This is basically a medieval recipe for making malachite, a blueish tone) The mixture smells terrible, and literally put me out of the house for a few minutes as it vented, but it is looking better than the straight up acid. I'll check tomorrow and see if it is feasible or appropriate to weather the copper a bit.

Wednesday, October 03, 2012

The Curing Process


I separate the layers by pouring epoxy resin on top. It's a finicky process that needs to be done in a sealed room. Over the next 14 hours the hardener catalyses, giving off a bit of heat in the corner of the studio.


So now, while I'm waiting, I'm trying to catch wasps. It's the yellow jackets I'm interested in. If I can catch enough of them, I will definitely use them in the painting. I need at least 3 yellow ones. I have two so far, but I had to left one go since it was brown, not yellow. :(

Wish me luck!

Tuesday, October 02, 2012

The Fused Glass Experiment

At the end of the night, this is the first layer. I arranged some fused glass pieces as the first part of the composition.


Here are some close-ups of the glass. It's very smooth and flowy, which contrasts nicely with the rough epidermis I've been working on.


 You can see that I've added some gold washes as well, and the blue-black shard is impressive. It's all about shine over here in Graeme's world these days.

The right side negative space
The background almost looks like a map. I would love to do another one of these as a straight up fantasy map. So I will cast the first layer of resin tonight, which should bind everything together. It takes a long time to cure and needs a sealed room to work well.
 
My tool kit includes the beer!


The Copper Landscapes of Mars

So I've started staining the background with copper. There are some very nice unexpectant results. Yes, none of the results are having babies, much to the chagrin of their parents, yet they are results welcomed into the arms of their relieved boyfriends.


Following are some details of the coppery textures:


The background is almost done. The next step is to set upon my milk-crate of materials, which, as I mentioned, contains a magical bag filled with many spools of broken guitar strings. Perhaps a metaphor secreted away for many years. Perhaps not.

Magic beans!

Saturday, September 29, 2012

Staining! Staining!

So I'm still staining away. The next picture is after a yellow stain. You can especially see it in the upper left corner. The background is still much to light, so I did another phthalo blue stain. 'Phthalo' clearly being one of the best words in the English language, by the way.


As it stands right now, with 4 stains over it, it's getting much closer to what I want.  I have the image I want to work with, but I'll keep it a secret for now, since the idea is still evolving. Like I said before, you got to keep that balance between intuition and planning.


I really like the drops of blue in the yellow area at the bottom.

Friday, September 28, 2012

The Making of a Painting: Part 1

Well, I haven't written anything here in a while. So here's to new beginnings!

PHASE 1: Organize your materials

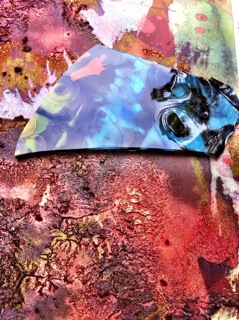
After cleaning my brushes, I decide to give the ol' work table a good sponging. The assembled crew of ins-and-outs consists of: clay area to the left; an array of containers of various materials in states ranging from liquid to solid; 2 jars of 'sludge', which is basically a crude mixture of the residual acrylix accumulated between batches of making colours at the paint factory; the pallet and tubes on the right side of the table; a wooden board with spray colours; and the magical milk crate filled with all the metallic goodies I could scrounge, including, much to my amusement, a bag of broken guitar strings.


PHASE 2: The Sludge


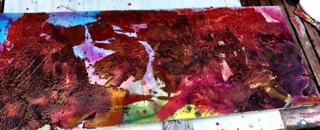
The first step forward is covering up the first layer with something called 'sludge'. It's basically the run off end bits of the acrylic plastic they used as a matrix for artificial colours. So basically it's the Tim bits of the paint world. It's those coloured bits all thrown into a jar together, and sold as a sculptural medium.  It's thick, but not very cohesive—something like a foamy, butter-like texture.

I tend to work intuitively in general, but working in layers requires planning. It's like balancing between extroversion and introversion, not at all like interrupting someone at a party by saying: "Mark! Your crotch is on fire!" Nothing like that at all.

Yes, that is me throwing up the ol' devil's horns, moonlighting as the Shadow King. And yes, that is the puppy, Mala pouncing on something. She's a terror.

PHASE 3: Staining


Over the next few days, I will be staining the sludge in the primary colours. Hopefully the end result will be a much darker underpainting. I want there to be a lot of texture to support the sheets of metal I will be working with.


Check out the awesomeness above!